Tuesday, November 30, 2021

Split Pea Soup

Living in California and driving from NorCal to SoCal down 101, I've stopped by "Andersons Pea Soup" restaurant many times. I've always enjoyed their pea soup though I haven't had it for years. Last night, my son asked his mom if she would make split pea soup. He didn't ask me? Pffft. I guess he hedged his bet on someone who made it before. I volunteered as tribute and we walked to the market to get a bag of green split peas.

The recipe I came up with was inspired by the Anderson's recipe and tailored to my desires.  You will need a way to mash the soup into a creamy delight. I used an immersion blender (OMG that was fun). You can mash it all through a screen strainer if that's your thing.

Ingredients: 

1 Package (1 lb) green split peas
2 Stalks Celery rough cut in 1-inch chunks
2 Carrots rough cut about 1/2-inch chunks 
1 Medium Onion rough cut into around 1-inch pieces
1 Medium Bay Leaf crumbled small but not powder
1 teaspoon Thyme
1/2 teaspoon Cayenne Pepper
1/4 teaspoon Kosher salt
1 teaspoon Lawry's (or your preferred brand) seasoned salt
1 quart unsalted chicken stock (substitute for water if you desire)
1 quart filtered water (or boiled and chilled, or set out overnight for chlorine to evaporate)

Optional - Chopped ham added to the finished soup

Making the soup:

Rinse the peas and remove any rocks or things that don't look like a split peas
Toss everything but the ham into the pot
Bring to a light boil then reduce to medium high rapid simmer
Rapid Simmer 20 minutes
Reduce heat and simmer for 25 minutes. Peas should be mushy. If not, check again in 5 minutes
Remove from heat and blend until smooth
Place back on heat and bring to a low simmer
Add salt and black pepper to taste
Add optional chopped ham.
Simmer until at serving temp

If you want to spice it up a little with more:
Add a little more Cayenne or Red Papper flakes
A teaspoon or two of Trader Joe's chili onion crunch
Try crumbling some Trader Joes canned fried jalapeno chilis on top

I rarely eat bread anymore but some sourdough or sweet French baguette would be great with it too.


Monday, November 15, 2021

Mac and Cheese Without The Mac

 Mac and Cheese made with cauliflower (cf) rather than carbohydrate laden macaroni. 

I imagined this dish after having gluten free pasta mac and cheese recently. Unfortunately, gluten free pasta has an many carbs as wheat flower pasts, so that doesn't help those of us who are on low carbohydrate diets for one reason or another. 

Substituting cauliflower was inspired by having a head of the stuff in the fridge. When roasted right, it has a good texture and can be a little toothy like pasta. Don't get me wrong, it isn't pasta and you will not be tricking anyone into thinking it is. That isn't the point. It is, however, a delicious dish on its own not trying to masquerade as something else.

This isn't a low-calorie dish. Sure, it has fewer calories than the pasta-based dish but is not low cal. I wouldn't call it healthy either. That's not why you eat mac and cheese or cf and cheese. The ingredients, below, give good insight to the fat in the dish.

What makes this to good? Cheese! Smoked Gouda and Sharp Cheddar. heavy cream and, of course, Bacon! I use a mildly smoked gouda that is cut from a roll and sold in 8 oz discs. My neighborhood market, Zonatto's, has a great selection of gouda packed by branded labels too.  I like the creaminess and mild smoked flavor.  Plus, it melts well for the cheese sauce. I use Tillamook Sharp Cheddar only.

This recipe does not need additional salt. There is plenty of salt in the cheese and bacon.  

Ok, onto the ingredients:

8 ounces Smoked Gouda, grated
4 ounces Sharp Cheddar, grated
16 ounces heavy whipping cream. I use 8 oz Clover and 8 oz Trader Joe's Shelf Stable. 
1 head Cauliflower
6 Slices Thick Cut Bacon
Ground Black Pepper
1-2 Tablespoons Olive Oil
Garlic Powder
Optional - Red Pepper Flakes

You will be doing the following few steps:

Much of this will be done at the same time.

  • Grate Cheese
  • Fry Bacon
  • Prepare and roast cauliflower
  • Make cheese sauce
  • Bake Casserole

Prep steps:

  • Preheat oven to 400F. I use convection with a rack in the middle.
  • Cut and prepare Cauliflower
  • Grate Cheeses

Cauliflower

Wash and dry the cauliflower. Cut in 1/4s then break by hand into small bite sized pieces. Place in a large bowl. Add 1 tablespoon olive oil and mix until cauliflower is lightly coated. I do this by hand. If you need a little more olive oil, add just enough to lightly coat.

Line a baking sheet with foil to make cleanup easier. Spread cauliflower evenly on the baking sheet. Sprinkle lightly with garlic powder and ground black pepper. 

Place cauliflower on middle rack in preheated oven and roast for 25 - 30 minutes. Test texture after 20 minutes. It should be a little firm. You don't want mushy cf and cheese.

Remove the cauliflower from the oven and let cool. I let both cool for about 30-45 minutes.
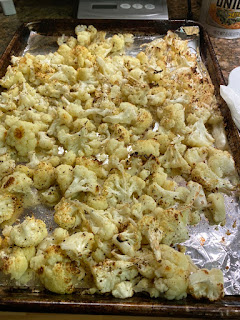

Roasted Cauliflower Cooling

Reduce oven heat to 325.

Grate Cheeses

Peel away the thin red coating off the gouda. The gouda I use has to be shaved off. I use a sharp knife but will try a vegetable peeler next time. Grate into a bowl.

Grate sharp cheddar. Set aside 2 ounces to sprinkle on top later. Put the other 2 ounces with the gouda.

Make Cheese Sauce

In a 2-quart pot (4-quart shown), heat heavy cream until it is simmering. Add 1/4 of grated gouda and cheddar mix. Stir constantly to mix and melt. Add 1/4 more, stir, mix, melt. Add the rest, mix, melt. This takes about 10-15 minutes.  Sprinkle some ground pepper to taste or preference.  If you want a little heat, add 1/2 tsp or desired amount of red pepper flakes. Once thoroughly melted, remove from heat and let cool. You can cool to room temp. I waiting until it was mostly cool but still able to pour over the cauliflower and spoon out the rest with a silicon spoon.
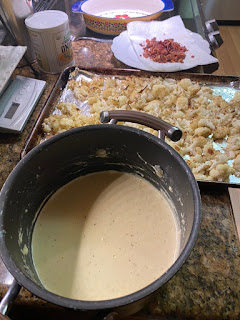
Cheese Sauce Cooling on the Assembly Line


Fry Bacon

Cook bacon to a mostly crispy texture. Move to paper towel lined plate and pat the excess oil off. Break into small pieces. I crumble by hand and leave it on the paper towel until needed.

Crispy Bacon Pieces


Assemble the cf and cheese casserole:

I use a 9" oval casserole dish. 

  • Put all the cauliflower in the casserole dish.
  • Pour cheese sauce over cauliflower coating everything
  • Sprinkle bacon all over
  • Top with 2 ounces cheddar
  • I like to place the casserole disk on a baking pan in case cheese bubbles over
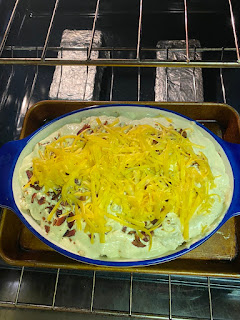
CF and Cheese Ready To Bake


Bake at 325 for 45 minutes.

Cheddar on top will brown and cheese will be bubbling.
Remove from oven and let it set 10 minutes covered with foil.

Eat!  As you can see, it was attacked before I could take a picture of the finished dish. 
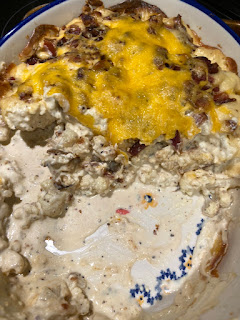
Finished - Note the Color Of The CHeddar


Bonus. We made a homemade cream of mushroom soup and added turkey meatballs and (Haricots Verts) green beans to go with the cf and cheese.  

Turkey Meatballs in Mushroom Soup and Green Beans


Saturday, August 21, 2021

Homemade Beef Jerky

 I'll keep this one more brief and concise and a bunch of pictures.

Beef:  Shoot for lean and trim excess fat.  I use brisket flat, top round, top sirloin, bottom round and top blade.  I always by the last minute, it's expiring sale meats. 

Start by freezing for 30-45 minutes to make slicing easier.

Meantime, make a rub or marinade.  Search for marinade recipes and fine tune them to your flavors.  

I always use Worcestershire and Tamari and will add in other liquids that sound good.  you do not want it too wet. So, keep the volume of liquid down.  If it is wet when it comes time to  dry it, just pat it with paper towels.

This recipe is very rough measurements and makes a paste that I hand mix all the strips of beef into ensuring every slice is coated. It is more of a thick rub that sticks to the meat.

I used 1.5 lbs  Top Sirloin 

1 tablespoon Worcestershire Sauce
1 tablespoon Low Sodium Tamari because it is gluten free.  Soy Sauce is fine too
1/2 teaspoon each

  • Mustard powder
  • Cinnamon
  • Thyme
  • Italian Seasoning
1/8 teaspoon blistering hot Ghost Pepper seasoning or whatever heat source you want or leave the heat out
1 teaspoon each
  • Granulated garlic
  • Onion Power
  • Smoked Paprika
  • Dark Chili Powder or whatever you got
If not using a smoker, add 2 teaspoons of liquid smoke
Note: I do not use salt or sugar.  I don't think it needs it. It's up to you.

This is a pretty dry marinade so I don't leave marinating very long.  About 30 minutes while I get the smoker/range going and the cookie sheets lined, stuff cleaned up, etc.  If you make a more liquid marinade, refrigerate a few hours.

Start the Smoker or Dehydrator. 

I set my Traeger to Smoke setting (runs 150-160F). I preheat for 15 minutes with the lid closed (after starting).

When using my ranger with a dehydrate function, I set it at 150F. If you have a convection over and can set it as low as 150F, that should be fine.  I preheat 15 minutes.

Slice the steak, against the grain, in 1/4 inch slices. 

Mix the marinade so it is a paste and spreadable.  You are going to use your hands to get this all over the thinly sliced steak. Add small amounts of  sauces if it is too thick. 

Thoroughly mix the beef in the marinade/rub making sure everything is coated. 

Space the meat out on parchment lined backing sheets (easier cleanup) with racks.  I needed two sheets this batch.

Put it in the smoker / dehydrator. 

On the Traeger, I smoke 4 hours.
In the Range, I usually go 6 - 8 hours. 

Testing for the right dry level is kind of a science. Bend it.  It should shred a little and slowly bend itself back.  You should taste test too.

Cool to room temperature.  You can store about a week in a zip lock or couple weeks in the refrigerator. 
I strongly encourage you to get food grade desiccant packs from Amazon or where ever.  Put 10 or 15 in the container. Beef Jerky WILL MOLD.  Desiccant helps A Lot.  If it molds, toss it.

Sorry, images are out of order.  Thanks Blogger! 


Saturday, July 17, 2021

Homemade Yogurt

 My friend at Chez Bung told me how easy it is to make yogurt.  As I have yogurt every day, we buy the big containers. I decided to give it a try and was thrilled how it turned out!

I followed the Chez Bung process with some slight changes.  The first couple batches I did not use powdered milk. I still sometimes forget it. It turn out great.

At first, I drained the whey (excess watery stuff) from the finished yogurt to make it thicker and more Greek Yogurty (it's a fine word). Using powdered milk lessens the need to drain the whey but I often do anyway just to make it thicker.

There are only three steps to making yogurt. Five if you choose to drain it. It really is only two ingredients. Three if you add powdered milk. Adding powdered milk increases the yield and a very small cost.